Mission Makers’ Manual
Once you have purchased a package for your organization, you’ll become a Mission Maker! That means you’ll be able to transform your stories and content into interactive augmented reality (AR) experiences.
Mission Makers’ Manual for Creating an Augmented Reality Game (Mission) at Your Site
Dear Fellow Agent,
Welcome to our handbook full of top-secret tips for making the best Missions possible! We are committed to empowering you to create Augmented Reality (AR) games that will elevate your visitors’ experiences and engage them with the history and beauty of your site. We know that a well-crafted Mission can increase visitor engagement by providing interactive, educational content that inspires kids (and kids at heart) to learn more about their surroundings. We’ve listened to our partner Agents across the globe to find out what works best for them, and we’ve assembled their intel in this guide.
As you’ll soon discover, making an effective and fun Mission is simple with our flexible Mission Maker. The Mission Maker gives you the ability to customize educational and interpretive experiences for even greater possibilities to engage visitors. Missions can change with the seasons, highlight specific events or site programming, and provide analytics on user activities. Changes and new Challenges will keep visitors coming back to your site to see what’s next! This platform makes it all possible.
I hope you’ll enjoy using Agents of Discovery and seeing your visitors engage with your site like never before. If you need any assistance along the way, please be sure to contact us any time at [email protected].
Happy Mission Making,
Getting Started
CONNECTIVITY
When building your Mission, we recommend using Google Chrome. Other supported browsers include Mozilla Firefox, Opera, Microsoft Edge and Safari.
- Have a strong Internet connection (at least 6-10 Mbps). 10 or more is best.
- If parts of the Mission Maker aren’t loading, try using a different browser or checking your firewall.
GET YOUR TEAM INVOLVED
- With your team, discuss where the best learning points are at your location.
- Plan your content in advance and get feedback, edits, and/or comments from your team.
- The more people that are involved in the Mission Making process, the more coordinated they will be in promoting your Missions on site and assisting your visitors. Make it a team-building exercise!
KNOW YOUR THEME
The “Agents” who play your Mission will remember well-organized themes better than a series of random facts. A thematic approach will help with your content organization, delivery sequence, key learnings, and call to action. See Appendix C for a thematic worksheet you can use to create your Mission.
- When planning your theme, consider the significant features that make your site unique.
GET READY, GO
- Think carefully about the best place to start your Mission. Great starting points include areas of natural congregation such as exhibit entries, day use areas, and Nature Centers.
- The first Challenge should be introductory. Options include: specific rules and practices, resource concerns, reinforcement of positive behaviors, or simply introducing your Agents to your agency.
NOT TOO LONG — KEEP IT SHORT!
Your total Mission time should be about 30 – 45 min. For outdoor Missions, we recommend a route of about 1 1⁄2 miles (2 km). Ideally, this would be done on a looped trail, with about 10 Challenges.
- Take a walk around your site and look for well-marked trails or walkways that would be complemented by your Mission. For indoor Missions, we recommend creating Challenges to complement your exhibits.
- Your target audience is likely children and their families, so make sure all your Mission text is clear and concise. This is especially important for any directions or instructions you may provide.
Managing Your Content
You can log into the Mission Maker here: mm.agentsofdiscovery.com
We recommend bookmarking this page so you can find it later.
USE OUR CHALLENGE LIBRARY AND GET GOING FAST!
For your convenience, we have developed an expansive Challenge Library full of ready-to-go Challenges that have been lovingly handcrafted by our curator team.
- You can easily copy these Challenges into your Missions, which is a great way to get started and get your Mission published as soon as possible. (See our guide on how to Place and Publish Challenges.)
- You can then go back in and tweak your content or add more Challenges whenever you like.
KEEP YOUR CONTENT RELEVANT
Our Challenge Library has lots of Challenges available to you, so have fun and switch it up to keep your Agents happy and coming back!
- If a Challenge isn’t working out, you can easily go in to the Mission Maker and edit your content.
- Update your content periodically to keep visitors coming back for more. We recommend refreshing your content every 3 months or so.
SEASONS AND EVENTS
One of the best features of Agents of Discovery is its dynamic ability to change Challenges, text, or images to align your Challenges with the seasons, exhibits, or events happening at your site.
- Adding Special Missions to complement special events has been a successful approach at many sites.
- Seasonal Challenges can also be rewarding (and add incentives for Agents to return to your Mission!).
MEASURABLE OBJECTIVES
Use the Statistics page to see how many users have played your Mission. These metrics can be used in your weekly or monthly interpretive reports and are excellent ways to gauge the success of your Mission.
TEST YOUR MISSION IN COMFORT!
When publishing your Mission, you can toggle Preview Mode ON, which will let you test your Missions on your phone without giving the public access. Preview Mode gives you extended controls to automatically reveal Challenges and test them right from your office! Just remember to turn Preview Mode OFF when you go live.
- Find instructions on using Preview Mode in Appendix A of this manual.
Launching and Promoting
SPREAD THE NEWS
In order to make your location a success, promote your Mission in your outreach efforts! Be sure to check out the How to Promote your Mission page for tips and ideas. Plus, don’t forget to download the Support Kit for guidance, assets, and more.
Here are the key elements that will help you successfully promote your Mission:
STAFF
- Your staff should be able to explain how to download the app, how to find your Mission, where to start your Mission, and how/where to collect their reward once they complete the Mission.
SIGNAGE
- Signs introducing your Mission should be placed in high-traffic areas, like entrances, bathrooms, or parking lots. We provide print-ready files and recommend investing in permanent signage.
- To purchase additional custom signs or Field Agent cutouts, email [email protected]. Life-sized Field Agent cutouts are eye-catching signage, and players love taking photos with them.
SOCIAL MEDIA
- Promote your Mission on social media to help reach new players. Make sure to tag us on Facebook @AgentsofDiscovery, on Instagram @agentsofdiscovery, or on Twitter @AoDiscovery.
- We can provide social media posts for Facebook, Twitter, Snapchat, and Instagram that you can easily copy and paste to promote your Mission.
- On Facebook and Instagram, we can invite you as a collaborator so that the promotion is shared to both our audiences. Contact us at [email protected] to start promoting with us.
- Promote new Missions online to grow your player community and encourage repeat visits.
WEBSITES
- Have a web page or section of your website that lets people know about your Mission and any rewards they can earn by playing. Be sure to update the site whenever you publish a new Mission.
- Let players find your Mission on the Agents of Discovery website! In the “Agents of Discovery Website – Mission Promotion” section in the Mission Maker, you can allow details of your Mission to be displayed on our live Missions list and map.
INCENTIVES
- Having digital and real-world rewards for players is a very important best practice.
- Think of accessible items you can easily distribute; we’ve seen everything from wristbands to water bottles to coloring books – even granola bars!
- You can order customized physical prizes from our Swag Store.
- If you don’t have a budget for physical prizes, get creative with digital prizes like digital badges, augmented reality filters, or hieroglyphs for players to decipher.
- Let people know about rewards prior to completing the Mission. (That’s what makes it an incentive!)
SOFT LAUNCH YOUR MISSION
Before publishing your Mission, we recommend testing with user groups (e.g. staff, children, local civic youth groups, your employees, volunteers, or advocates).
- Explore your Mission with these Agents and ask for their feedback. Connecting with the players is key!
- Once ready for the public, announce the launch in conjunction with another signature event. You can also choose a grand opening date. Consider inviting local dignitaries, leaders, and potential sponsors.
On-Site Representation
PROVIDING DEVICES
Many sites have purchased smart devices to lend to visitors, preloaded with the Agents of Discovery app and their Mission. This is an excellent option in locations where cell service and WiFi aren’t available. Remember, you need WiFi or data to download the game, but you won’t need it to play.
GUIDED Agents of Discovery
Many sites have added Agents of Discovery to their regular, in-person guided programs.
- Volunteers and Camp Hosts can incorporate Missions into their regular programs (e.g. a Junior Ranger Program).
ADDING EXTRA FEATURES
As you become more familiar with Agents of Discovery, consider some of the optional upgrades, such as customized Field Agents, maps, rewards, cut-outs, etc.
ADVOCATE AMBASSADORS
We are actively seeking ambassadors (or “Agents in Place”) for Agents of Discovery, and we offer a wide range of rewards for participation, including free upgrades/credits for your Mission.
FEEDBACK
If you’ve found something to be challenging or think it could use more explanation, please let us know! Our team is constantly upgrading the game and adding new features. Please let us know if you have ideas to help us ensure that Agents everywhere have the best possible active learning experience.
SUCCESS STORIES / TESTIMONIALS
We want to hear from you! We love testimonials, so please let us know your thoughts. If something is really working for your location, we want to know about it so that we can share your tips!
For assistance, please contact Customer Success at
[email protected]
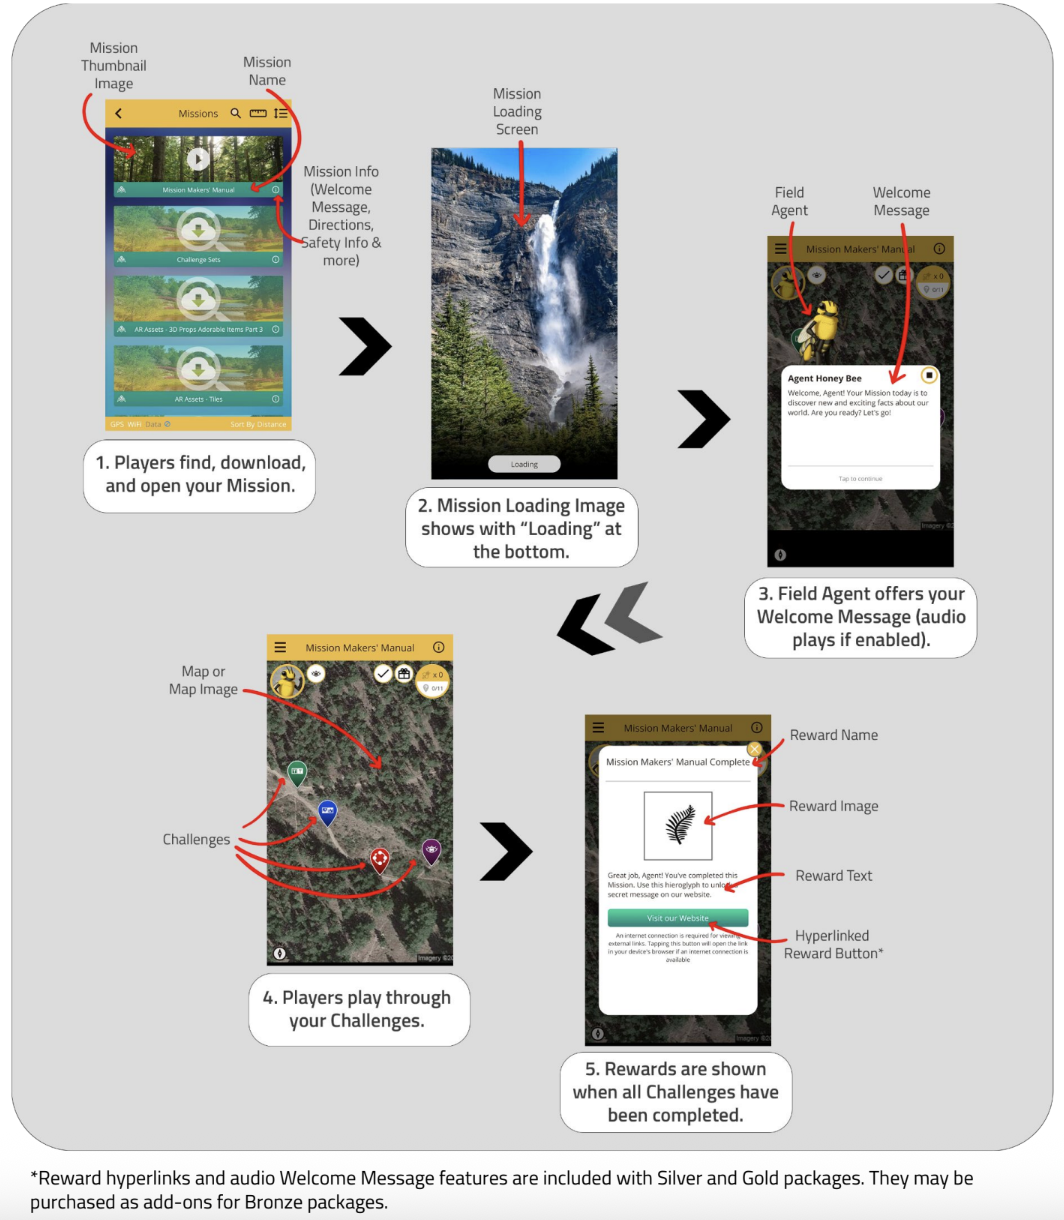
Mission Components
MISSION NAME – Every Mission needs a name. This lets players find it in the Agents of Discovery app.
MISSION TYPE – There are 4 different Mission types: GPS, Trigger, Mixed, and Virtual Tour. You can read more about them here.
FIELD AGENT – Your Field Agent guides players through your Mission.
WELCOME MESSAGE – Your Welcome Message introduces players to your Mission. It is the first thing players read once your Mission has loaded.
DIRECTIONS – Here, you can provide directions to your site and/or Mission starting point. Players will be able to access it before they visit.
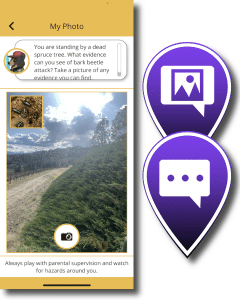
SAFETY INFORMATION – Provide any relevant safety information here. Players will be able to access it before they visit.
REWARDS – When players complete your Mission, they will be shown your reward screen. Rewards have text and an image, and Mission Makers with Silver and Gold packages can also add a hyperlink. Every Mission must have at least one reward.
MAP – Your Mission map defines the bounds of your Mission. Your Field Agent, as well as all Challenges and Trigger Groups, must be placed somewhere on the map. Your default map will be taken from Google satellite imagery, but you can also upload a custom image or request a customized map (included with Silver and Gold packages).
Where you place your Field Agent defines your Mission starting point, and your Reveal Radius defines how close a player must be to a Challenge in a GPS Mission before it is revealed on the map.
Mission Structure
Best Practices for Creating Missions
MISSION NAME
- Make sure your Mission name is unique, enticing, and succinctly describes what the Mission is about. Remember, the name of your Mission is how visitors will find it in the Agents of Discovery app.
- A great naming convention is to use the theme, then the location, in that order. For example: “Pollinators at Paris Mountain State Park.”
FIELD AGENT
- Make sure your Field Agent represents your site. You can use any of our Basic or Seasonal Field Agents, and you can use different Field Agents for different Missions!
- If you have paid for a custom Field Agent, use it! (Have you submitted your order form yet? You can find it in our Support Kit.)
WELCOME MESSAGE
- Your Welcome Message should introduce players to your site and let them know what they will learn in the Mission they are about to play. (This is especially important if you choose to have your Welcome Message display on the Agents of Discovery Missions page.)
- It should include your call to action and make visitors want to play!
- Your Welcome Message is your earliest opportunity to help direct your players around your site. Include instructions on how to unlock Challenges and where the first one can be found.
- With a Silver or Gold package, add audio to your Welcome Message to make your Mission more engaging. (If you have a Bronze package, you can purchase this feature as an upgrade.)
DIRECTIONS
- Directions in your Mission are used to direct players to your site and to your Mission starting point.
- Always be clear and descriptive in your directions.
- Keep in mind that players must be able to find and/or unlock your Challenges. In ‘GPS’ and ‘Mixed’ Missions, Challenges are hidden until players draw near. In ‘Trigger’ and ‘Mixed’ Missions, players require specific QR or IR triggers to unlock Challenges. Provide additional directions as needed.
SAFETY INFORMATION
- Test out your Mission to ensure that players will not encounter any safety hazards along the way.
- If your site has hazards that players should be aware of, use the Mission Safety Information and/or other Mission/Challenge components to let them know.
- As a general rule, we recommend that players have an 8 ft x 8 ft space in which to play AR Sorter and AR Sequencer Challenges and that they always be aware of their surroundings. We typically mention this in the Safety Information and try to set AR Challenges in an open area.
REWARDS
- Never underestimate rewards! They can be a huge motivator for visitors to play your Mission.
- If you offer a physical reward at your site, such as stickers, pencils, or badges, use the Mission reward text to give players instructions on where they can collect their prize.
- With a Silver or Gold package, you can send players to a website for their reward. (If you have a Bronze package, you can purchase this feature as an upgrade.) Be mindful of whether or not your site has accessible WiFi.
- With multiple Missions, you can keep replay value consistent for any repeat guests and encourage them to collect all of your different prizes!
MAP
- Make sure that your Field Agent is positioned at the starting point of your Mission.
- If you are having trouble with your map, such as uploading or zoom issues, contact [email protected] for assistance.
For on-site Missions:
-
-
- Don’t make your route too long. For outdoor Missions, we recommend a route of about 11⁄2 miles (2 km). Ideally, this would be done on a looped trail, with about 10 Challenges. The total Mission time should be 30 – 45 min.
- Make sure that directions are clear and players are able to navigate your map.
- Make sure that visitors will be able to find all the Challenges you’ve hidden.
- Be precise when placing Challenges or uploading a custom map.
-
- Come back and review these points after you have published your Challenges, if you have not already done so.
LASTLY…
This brings us to our final and most important best practice. We’ve said it before, and we’ll say it again: test out your Mission! Make sure it’s safe and plays the way you want it to, and ask others to play and review it as well. This is a great way to help anticipate if your Mission is an appropriate length and engaging enough to keep
players entertained. Use Preview Mode to test your Mission before making it live to the public.
Challenge Components
CHALLENGE NAME – Every Challenge needs a name.
CHALLENGE TYPE – This determines what type of activity will be involved.
USBees – When players complete a Challenge, they earn USBees (points). There is a default number of USBees per Challenge, or you can use custom values. The USBees they earn from the Challenge will decrease with each mistake. (If a player made mistakes, they can replay the Challenge for another chance to earn all possible USBees.)
PRE-CHALLENGE – This is what pops up when a player first clicks on a Challenge icon. The Pre-Challenge has both text and an image.
QUESTION OR ACTIVITY– This appears after the Pre-Challenge message. The type of question or activity involved will vary according to the Challenge type. Players will only be allowed to proceed when they have selected the correct answer.
POST-CHALLENGE – The Post-Challenge message appears after the player correctly completes the question or activity (regardless of how many mistakes they made along the way).
Challenge Structure
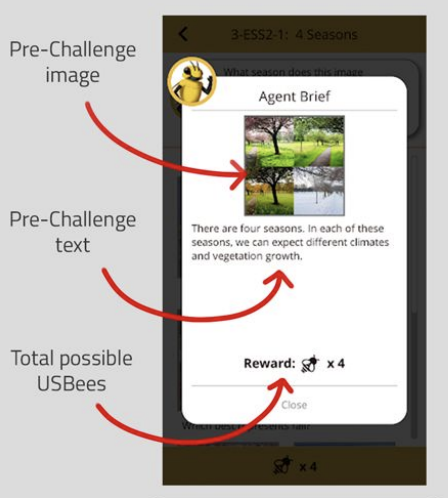
1. Pre-Challenge pop-up
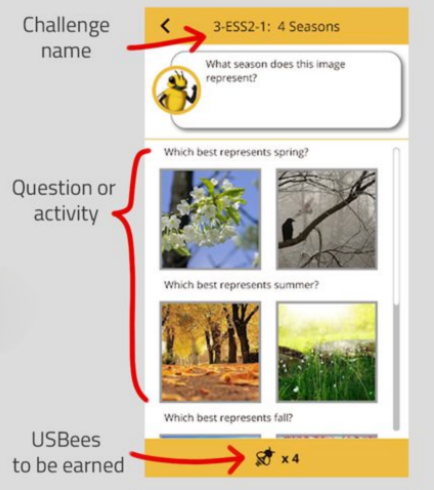
2. Challenge Question or Activity
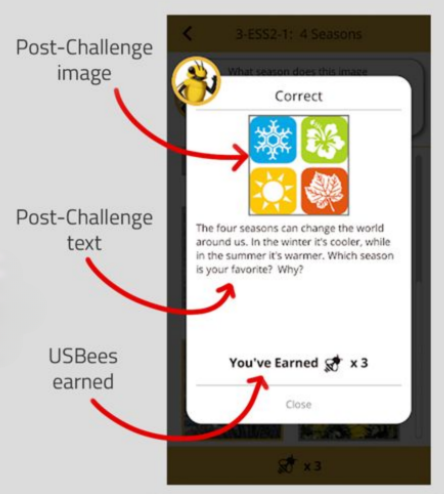
3. Post-Challenge Pop-Up
Challenge Types
See the list of Challenge Types here.
AR Picker
Players look around in Augmented Reality for the correct answers.
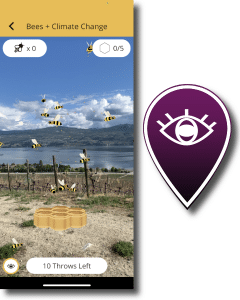
AR Catch
Players use their devices’ camera to catch objects in augmented reality!

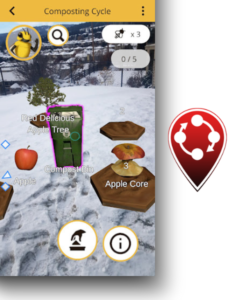
AR Sorter
Players “pick up” AR objects and sort them into containers.
AR Sequencer
Players place virtual objects on platforms in a particular order. You can choose to sequence objects in a circle or in a straight line.
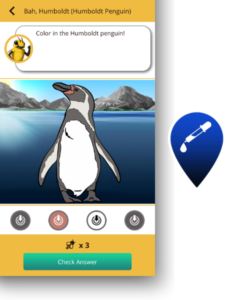
Color Picker
Tap on the colors to correctly color in the picture.
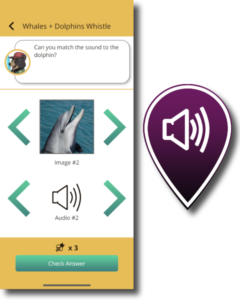
Sound Matcher
Upload 3-4 sound clips & an image of the sound maker. The image should match ONE sound clip. I’ll warm up for my solo!
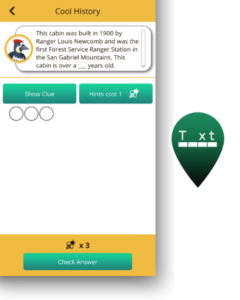
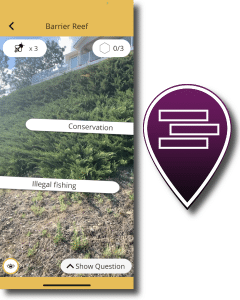
Detective
Fill-in-the-blank question with an image as a hint!
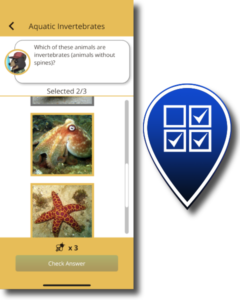
Image Checklist
Choose ALL the correct image-based answers!
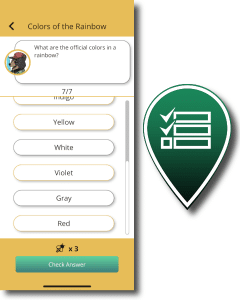
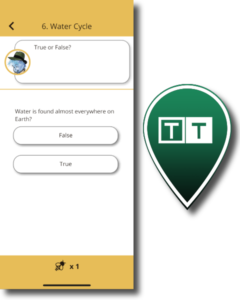
Text Checklist
Choose ALL the correct text-based answers!
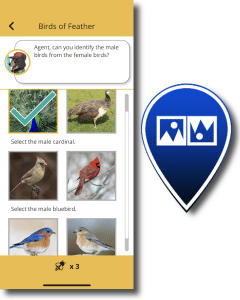
Image 50/50
You can ask multiple questions in these Challenges!
Text 50/50
You can ask multiple questions in these Challenges!
Player Response
These Challenges let you to ask players open-ended questions.
Player Response
These Challenges let you to ask players open-ended questions.

Trigger Challenges
In ‘Trigger’ and ‘Mixed’ type Missions, players unlock one or more Challenges by scanning a real-world trigger with their camera. There are two types of triggers that you can use in your Missions: QR triggers and IR (image) triggers. These should be printed and placed around your site so that players can find them.
Now you’re ready to Make your Mission!
Contact Agents of Discovery if you need help out in the field: [email protected]
Best Practices for Creating Challenges
These tips are intended to help Mission Makers create a compelling and accurate Challenge. Before beginning to write Challenges, it is useful to go through a thematic development exercise. The Challenges should loosely follow a narrative that ties the Mission together as a cohesive experience. Mapping out the Mission location will help ensure the theme plays out as intended in the physical setting. You can use the thematic worksheet in Appendix C to help you with your planning.
Consider any educational standards you need to meet when writing your Challenges. For parks and similar public spaces, a useful source created by the National Parks Service can be found here: https://www.nps.gov/idp/interp/230/module.htm
Now on to the best practices…
Make use of the Challenge structure.
- The Pre-Challenge needs to provide context for the Challenge and help players answer the question.
- The Question(s) and Answer(s) should be short, succinct, and convey key info.
The Post-Challenge should help explain why the answer was correct and reward players by providing even more information about what they just learned. Encourage them to reflect on their new knowledge and apply it to their immediate surroundings or everyday life. - In some cases, you can also use the Post-Challenge to help the guest navigate to where the next Challenge is located.
There are 12 different types of Challenges. Review the construction of each to be sure you are using the best possible Challenge types for your content. It’s worth having a mix of Challenge types so the experience is varied during the Mission. Also keep an eye on the Mission Maker and on our Customer Success Blog – occasionally we add new Challenge Types or update existing ones.
Make sure you are using authoritative sources and that Agents of Discovery or your organization has the rights to share the images and audio. (See Appendix B for a list of suggested authoritative sources.) If you don’t have your own media to use in your Mission, our Creative Commons integration makes it easy to find public domain images and audio and quickly drop them into your Mission. Please check our legal guidelines on copyright, and contact [email protected] if you have questions.
Match your images to your text! Do this for each section: the Pre-Challenge, the Post-Challenge, and in the Challenge itself. This will ensure your Challenges are cohesive and reinforce your messages. Images should be at least 512 x 512 pixels in size. You must have the rights to any media you utilize. If you do not have the rights, you can use public domain images.
This is an educational game played on a mobile device, so text must be short (maximum 30 words) and to the point. The idea is simply for the participants to quickly capture the key points. Always keep in mind that your text will show up in a dialog screen on a smartphone or tablet. Too much text can distract players, or in some cases, even make them lose interest.
Use language that the target group will understand. Write according to reading comprehension ability and avoid passive tense. Bonus points for writing from the perspective of your Field Agent! If you are not an educator, or do not have educational experience, consult with an Agents of Discovery team member for help.
Test out your Challenges. This is a big one. Whether you are working alone or with a team, make sure someone else is checking your work. Ideally, test out the Challenges with a sample of the participants they are intended for. Ask:
- Does the Pre-Challenge help them answer the Challenge question?
- Does the Challenge provide new information they didn’t know before?
- Does the Post-Challenge provide additional info that makes them even more interested in learning?
- Does the Challenge make a human connection between the player and the content?
- Does the Challenge content relate to and complement what the Mission participants will locate at the Mission site?
- Is all of your content correct and verifiable?
- Do the words and the images/audio match?
- Can they comprehend it the first time they read it?
- Is it personally engaging for them?
- Is there any text you can edit out?
- Are all the AR objects sized well? (We recommend consulting our sizing chart. Keep in mind that the more objects you use and the larger they are, the more play space will be required.)
Make sure to use Preview Mode when testing your Mission.
Happy Mission Making!
You’ve reached the end of the manual.
Continue on for Appendices.
Appendix A: How to Use Preview Mode
Want to test your Mission from the comfort of your home or office? Try Preview Mode. In the Mission Maker, toggle Preview Mode to ‘On’ on your Mission. Then, in the app, simply tap the Agents of Discovery logo and hold it down for 3 seconds.
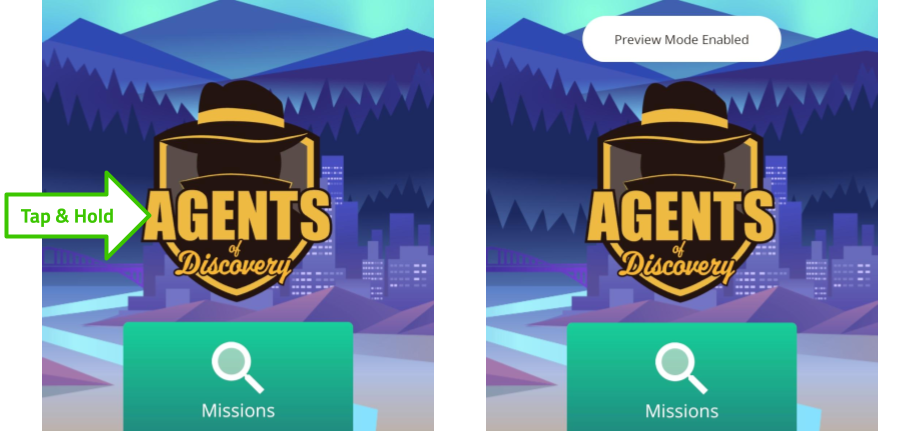
Once Preview Mode is enabled, your Mission should appear in the Missions list!
When testing your Mission, there are some added controls you can try out:
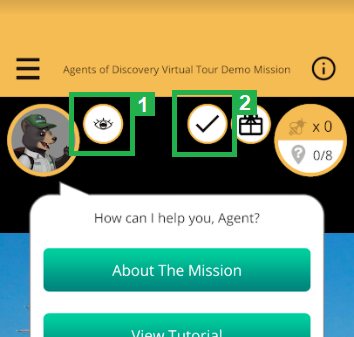
1) The Eye Icon
Tap this to make ALL your Challenges appear, so you don’t have to be at the physical location in order to test them!
2) The Checkmark Icon
Tap this to auto-complete the Mission and see your Reward Screen.
You can Reset the entire Mission by tapping on your Field Agent in the top corner and selecting About The Mission. At the bottom of the page that appears, select Reset Mission.
We encourage you to test your Missions on site, but if you don’t have time, Preview Mode is a great option. Happy Testing!
Appendix B: List of Authoritative Sources
Make sure you are using authoritative sources to create your content and that Agents of Discovery or your organization has the rights to share the images and audio. Please check our legal guidelines on copyright. If you have a question, contact [email protected].
Here is a list of authoritative sources that we have assembled at the time of writing. Some provide public domain media that you can use in your Mission, some provide reliable information on various subjects, and some do both.
General Educational Sources
- The British Library: http://www.bl.uk
- Library of Congress: https://www.loc.gov
- Open Educational Resources Commons: https://www.oercommons.org
- PBS Learning Media: http://www.pbslearningmedia.org
- Smithsonian Encyclopedia (Science and Technology, Biodiversity, Art and Design, History and Culture): http://www.si.edu/encyclopedia
- Smithsonian Learning Lab: https://learninglab.si.edu/
Art and Architecture
History
- National Archives (US): https://www.archives.gov/education
Life Sciences and Biodiversity
- Biodiversity Heritage Library: http://www.biodiversitylibrary.org/advsearch
- Calscape.org: http://www.calscape.org/loc-California/
- Encyclopedia of Life: http://eol.org
- iNaturalist: http://www.inaturalist.org
- The Public Health Image Library: https://phil.cdc.gov/phil/home.asp
- U.S. Fish and Wildlife Services: https://digitalmedia.fws.gov/digital/
Parks
- National Parks Services: https://www.nps.gov/media/multimedia-search.htm
Space
- NASA Galleries: https://www.nasa.gov/multimedia/imagegallery/index.html
- More from NASA: https://soundcloud.com/nasa
Water & Agriculture
- Food and Agriculture Organization: http://www.fao.org/about/en/
- National Oceanic and Atmospheric Administration : http://www.noaa.gov/
- U.S. Geological Survey Education Site: https://water.usgs.gov/education.html
- USDA Agricultural Research Service: https://www.ars.usda.gov/oc/images/image-gallery/
- The University of Arizona – Open Water Repository: http://arizona.openrepository.com/arizona/handle/10150/135401
General Sources for Sounds & Images (mixed public domain and copyrighted)
- Openverse (formerly Creative Commons): https://wordpress.org/openverse/
- Free Images: http://www.freeimages.com
- Freepik: https://www.freepik.com/
- Free Sounds: http://soundbible.com
- Pixabay: https://pixabay.com
- Pixnio: http://www.pixnio.com
- Unsplash: https://unsplash.com
- Wikipedia Commons: https://commons.wikimedia.org/wiki/Main_Page
- Wikipedia list of public domain image sources: https://commons.wikimedia.org/wiki/Commons:Free_media_resources/Photography
Note that, as these domains are maintained by third parties, we cannot guarantee their ongoing functionality.
We’re always open to learning about other potential sources that other teachers might find useful. Please let us know if you come across a great resource!
Appendix C: Thematic Worksheet for Mission Creation
These steps follow the basic thematic building blocks and are intended to help you build the best Mission possible. When developing new Missions with Challenges, imagine that you are developing a guided tour or hike. The hike should be 1½ miles long and should take less than an hour.
Think about the purpose: what do I want my audience to see and learn, and what actions would I like to see as a result? What sorts of things can they learn about in a Challenge, and then look up and see in front of them? If these are questions that have been on your mind, you are on the right track!
1. BASE BACKGROUND INFORMATION
A. Think about your target audience. Pick up to 3 audiences to target.
B. We recommend that the Challenges should RELATE to the site, so it is important to list the goal of the site (or agency).
C. What is the significance of your site? What makes it special and unique from other sites?
D. What is the purpose of your site? Why was the site created?
OK, now we have a better understanding of who you want to play your game, what is important at your site, and its purpose. Now it is time to start developing a central theme that you can base your Challenges around.
2. STAGES OF THEME DEVELOPMENT FOR YOUR MISSION
A. Start with a topic. Consider the experience of your site as a starting point.
B. After brainstorming with others, narrow the topic. Now consider what key message you want to share with players.
C. Once you have narrowed the topic down, think about what you want the audience to carry away with them and understand.
D. OK, you are now on your way to creating a solid theme that you can base your Challenge content around. Think about relevant universal intangibles (emotions, feelings, concepts) that EVERYONE can relate to. List the universal intangibles.
E. Now craft a theme statement that combines all of the above.
The work above should help guide your Challenge content and ensure that Agents relate to your site, its significance, and its purpose/mission. Please note that you can repeat this exercise to develop other themes. We recommend keeping it to no more than three themes.
3. CHALLENGE CONTENT
We have developed some Best Practices for Creating Challenges. We encourage you to keep these in mind as you develop your content.
A. Remember your Players’ Needs
Adding the location of your boundaries, trail information, and what to expect are all basic needs your players will have, and you can weave these needs into Challenges and opening statements. Write your Welcome Message below (should be less than 40 words).
B. Rules and Regulations
Adding a couple of Challenges about rules and safety is a great practice to help orient your users to your rules. Write down some of the common safety messages and/or rules that may be helpful to introduce at the beginning of the trail.
C. Where Not to Go
Most sites have areas that you may want children or large groups to avoid (such as cliffs, sensitive areas, or dangerous spots). List areas to avoid.
D. Learning Opportunities
As you know, your site abounds with opportunities to learn, so ensure you pick Challenge locations that allow the resource to touch players’ hearts and minds through observations, sound, and touch. Platforms, views, boardwalks, viewing stations, historic structures and landscape viewing areas are all great locations for Challenges. List the opportunities that include a starting point.
. Measurable Objectives
Measurable objectives are excellent ways to gauge the success of your Mission. You can be creative and develop real-world objectives such as reducing trash on a trail, cleaning up vandalism, or basic rule adherence. You can also use the analytics report to measure how well players understand Challenges and learning objectives. Write down some measurable objectives you would like to see while playing the game. Try for at least 3-5 objectives.
F. Completing the Mission
Agents of Discovery has a cool feature that allows you to send a message of congratulations when a player completes a Mission. List the digital and tangible rewards your site could offer and/or the main call to action (such as following on social media, etc). Include any QR/Barcodes for rewards such as stickers, discounts, or other promotional materials you may offer.